Then you will need to launch a local Java instance of the GameLift service. This is useful to test your Game before uploading it to AWS. By default it will launch using the 80 port but you can change it by adding the parameter -p followed by your port number of choice.
java -jar GameLiftLocal.jar -p 9080
Then go to your Server Build folder and launch the Server. For that, we will right click on the explorer, create a shortcut, and right click on the created shortcut->properties and add -log -port=7788 or any other port of your choice.
Double click on the created shortcut to start the Unreal Server.
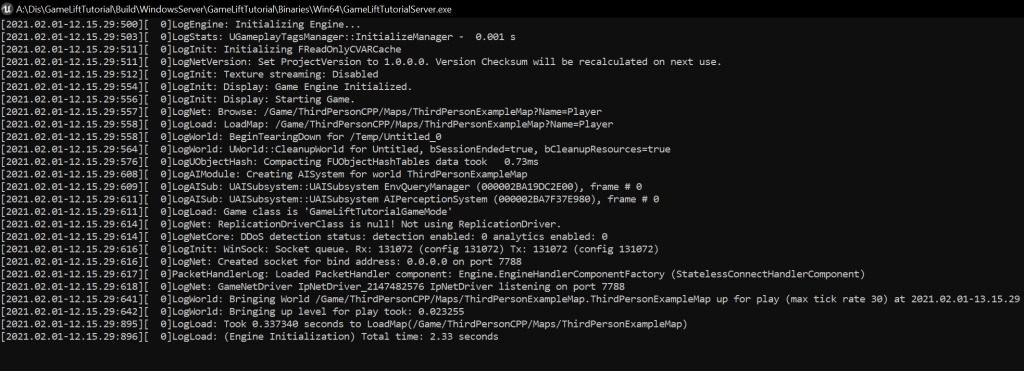
We should see something similar to this, indicating that everything went OK.
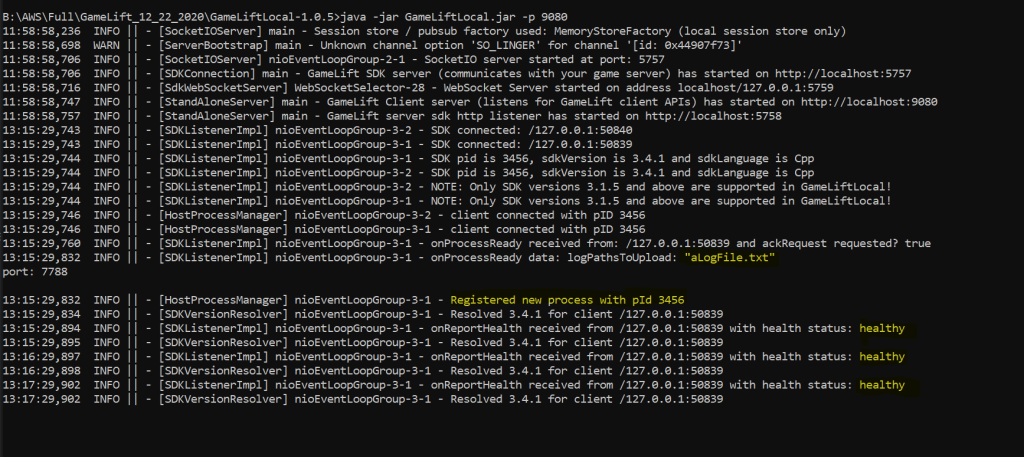
If you go back to the CMD Window of the local GameLift Server, you will see that a new Process has been registered, that is our Game. There are several Status health reports indicating that is healthy.
Then go ahead and create a fleet. For that type the following:
aws gamelift create-game-session --endpoint-url http://localhost:9080 --maximum-player-session-coun 2 --fleet-id fleet-1Where –fleet-id can be any string as long as it has the prefix fleet- Press enter and it will return a JSON object of the Game Session created.

You can see on the GameLift Local Server CMD window that the OnStartGameSession was invoked by GameLift because it wants to start a Game Session on our Server Process. You can see it here highlighted:

If you want to check all game sessions in a fleet you can type:
aws gamelift describe-game-sessions --endpoint-url http://localhost:9080 --fleet-id fleet-1And it will return something similar to this:

We still need two more files for our server build to run successfully on an EC2 instance, Visual C++ redistributable file and a batch file that we will upload to GameLift and will install the required dependencies for our Unreal Engine Game to run. After that we can go ahead and upload our Server Build to GameLift.
Visual C++ redistributable is a DLL file that is required by programs build in Visual Studio, without it, our Server Build can’t run. You can install it from here vc_redist.x64.exe.
Create a file named install.bat in the root folder of the Server build, open it and type:
VC_redist.x64.exe /q
Engine\Extras\Redist\en-us\UE4PrereqSetup_x64.exe /q
Save the file.
Open a new Command Prompt and type the following command:
aws gamelift upload-build --name GameLiftTutorial --build-version [any name that you want] --build-root [path-to-server-build-directory] --operating-system WINDOWS_2012 --region [region-code]So in our case it will something like this:
aws gamelift upload-build --name GameLiftTutorial --build-version 1.0.0 --build-root "A:\Dis\GameLiftTutorial\Build\WindowsServer" --operating-system WINDOWS_2012 --region eu-central-1Give it some minutes and if everything went OK the CMD will print something like this:
B:\AWS\GameLift-Cpp-ServerSDK-3.4.1>aws gamelift upload-build --name GameLiftTutorial --build-version 1.0.0 --build-root "A:\Dis\GameLiftTutorial\Build\WindowsServer" --operating-system WINDOWS_2012 --region eu-central-1
Uploading A:\Dis\GameLiftTutorial\Build\WindowsServer: 365.9 MiB / 365.9 MiB (100.00%)Successfully uploaded A:\Dis\GameLiftTutorial\Build\WindowsServer to AWS GameLift
Build ID: build-61ac4b86-1716-4f1d-b265-3c89c2071df8
Click on Now go back to your AWS console and find Amazon GameLift in Services. In the Dashboard, click on the name of your build.

Let’s create a fleet by clicking on “Actions” and then “Create fleet from Build”.

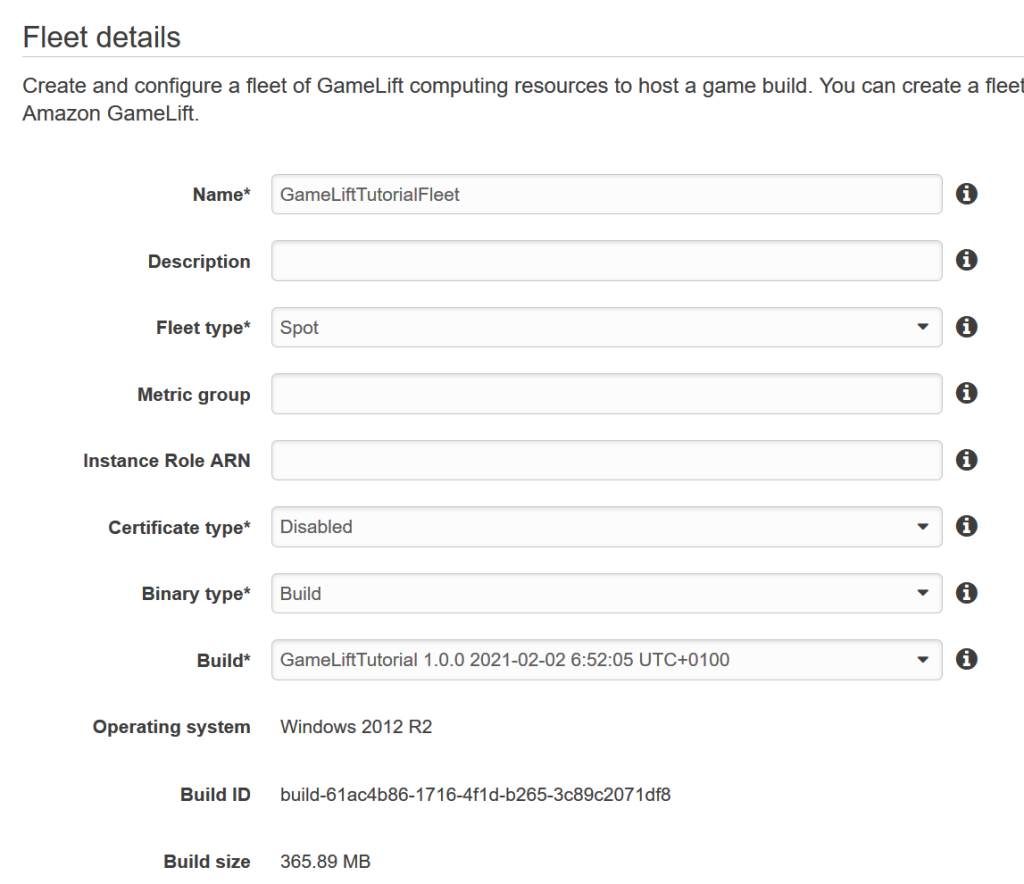
You will see a form to create the fleet. The Fleet Type determines if you want cheap Spot instances that can be terminated after a 2-minutes notification, the price is lower and can fluctuate or On-Demand instances in which your resources are secured but are more expensive.
The instance Role ARN is for assigning Roles to the fleet so it can have specific access to AWS. For example to read and write to a data base. We will leave it blank by now.
Certificate Type is for whether or not you want GameLift to generate a TLS certificate so that when your client establishes a connection with your Game Server your client can authenticate the Server by using the TLS certificate sent from the Server to the Client. The certificate contains many things to validate the authenticity of the Server. Known as the TLS handshake, useful to secure your applications.
For the binary type is Build or Script. Which would be either our compiled code or script, select Build.
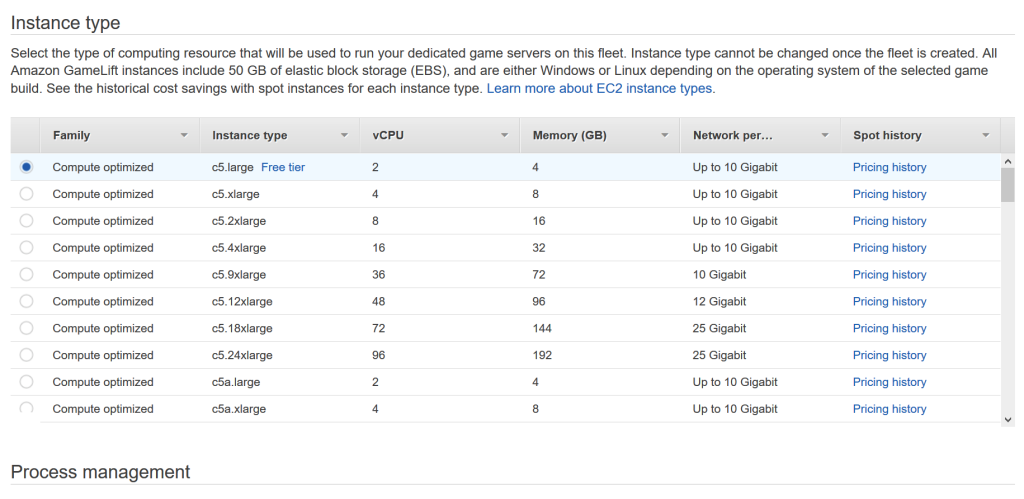
Instance type is the type of hardware instance that will be used to power your Server Build. Each option will give you a good description of the different options.
We are going to leave it at the Free tier for this tutorial, but I encourage you to play a bit with the different configurations. Rule of thumb the more powerful resources the more expensive.
Then scroll down to where it says Server process allocation. Then you can specify the executable file to Launch. in our case it will be:
GameLiftTutorial\
Binaries\Win64
\GameLiftTutorialServer.exe
Launch parameter will be used to specify the Port and other Unreal Engine parameters such as the Level, the Game Mode or anything that can be passed to the engine as a parameter.
-port=7777
If you want it, you can run multiple server processes adding more configurations and changing the port like this:

Click on the green tick button to confirm.
Next is the Game Session activation settings. You can configure the number and frequency of game session activations so it fits your needs of your Game.
Following, we can find EC2 port settings. There we must specify the inbound access of the port ranges. Each server process in this fleet must use an IP address and port in these ranges. Please go ahead and configure it like this:
Port range:7777-7778
Protocol:UDP
IP address range:0.0.0.0/0
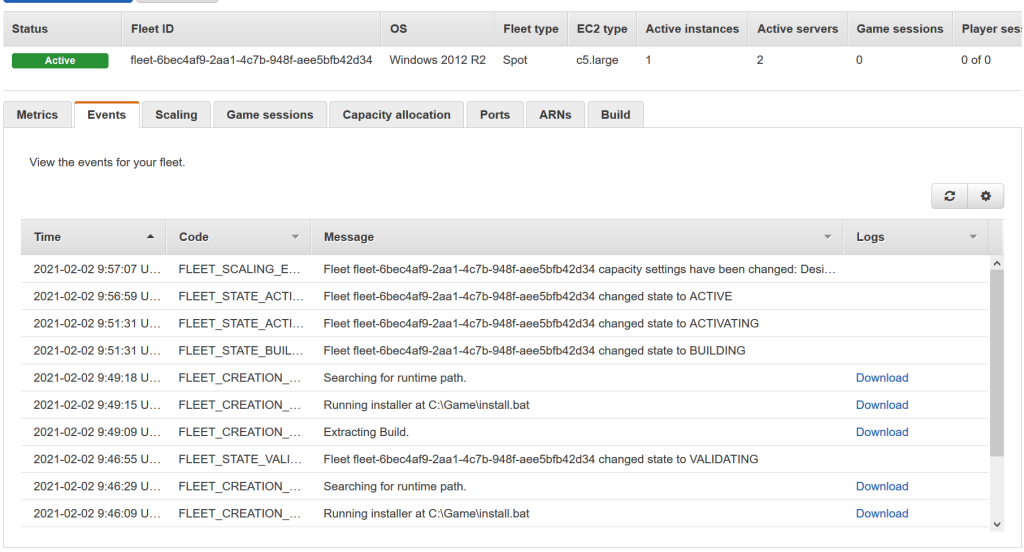
Click “Initialize fleet” and wait a bit, you can always go back and check the status of your fleet in the AWS console. If you have successfully created a fleet you will be able to see “Active” in “Status”.
Let’s now create a queue! Go to the top and select “Create a queue”.
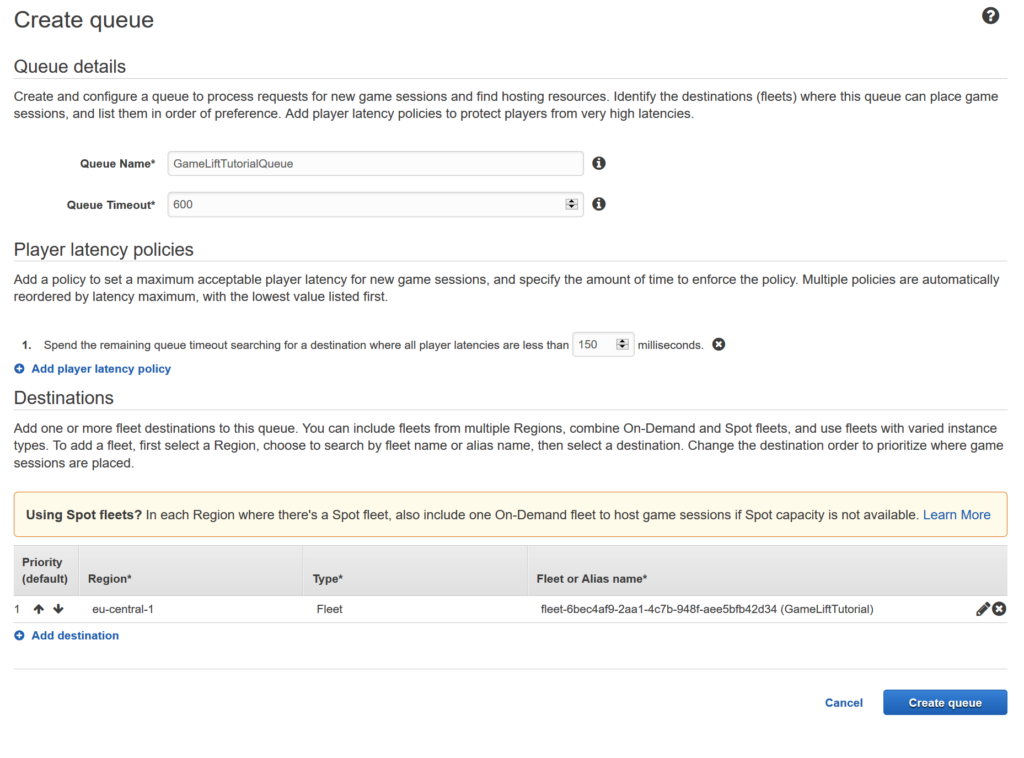
And press Create Queue!
Now let’s talk about FlexMatch.
FlexMatch is the System of GameLift for matchmaking. Go ahead and press “Create matchmaking rule set” in the top menu. These values are taken from the AWS FlexMatch Developer Guide.
The “rules” array attribute describe a set of rules with objects. Each object is separate individual rule. But all rules will be applied when starting a match. For each rule 2 fields are applied, “name” and “type”.
I only changed values for “minPlayers” and “maxPlayers” to test with just one computer. I changed the description of “EqualTeamSizes” object to
"description": "Only launch a game when the number of players in each team matches, e.g. 1v1, 2v2",This rule warranties that the match has the same amount of players in each team.
Expansions relaxes the rules so if the rules can’t be met, the expansions will be read to try to make a match.
Rule set name:GameLiftTutorialRuleSet
Rule set:
{
"name": "aliens_vs_cowboys",
"ruleLanguageVersion": "1.0",
"playerAttributes": [{
"name": "skill",
"type": "number",
"default": 10
}],
"teams": [{
"name": "cowboys",
"maxPlayers": 2,
"minPlayers": 1
}, {
"name": "aliens",
"maxPlayers": 2,
"minPlayers": 1
}],
"rules": [{
"name": "FairTeamSkill",
"description": "The average skill of players in each team is within 10 points from the average skill of all players in the match",
"type": "distance",
// get skill values for players in each team and average separately to produce list of two numbers
"measurements": [ "avg(teams[*].players.attributes[skill])" ],
// get skill values for players in each team, flatten into a single list, and average to produce an overall average
"referenceValue": "avg(flatten(teams[*].players.attributes[skill]))",
"maxDistance": 10 // minDistance would achieve the opposite result
}, {
"name": "EqualTeamSizes",
"description": "Only launch a game when the number of players in each team matches, e.g. 1v1, 2v2",
"type": "comparison",
"measurements": [ "count(teams[cowboys].players)" ],
"referenceValue": "count(teams[aliens].players)",
"operation": "=" // other operations: !=, <, <=, >, >=
}],
"expansions": [{
"target": "rules[FairTeamSkill].maxDistance",
"steps": [{
"waitTimeSeconds": 5,
"value": 50
}, {
"waitTimeSeconds": 15,
"value": 100
}]
}]
}The next thing that we need to create is a Simple Notification Service.
Create a topic with the name “FlexMatchEventNotification“, leave most default values.
In “Access policy” go ahead and change to Advance and in the JSON object change it to the following, “Sid” can be whatever you want but must be unique.
{
  "Version": "2008-10-17",
  "Id": "__default_policy_ID",
  "Statement": [
    {
      "Sid": "__default_statement_ID",
      "Effect": "Allow",
      "Principal": {
        "AWS": "*"
      },
      "Action": [
        "SNS:Publish",
        "SNS:RemovePermission",
        "SNS:SetTopicAttributes",
        "SNS:DeleteTopic",
        "SNS:ListSubscriptionsByTopic",
        "SNS:GetTopicAttributes",
        "SNS:Receive",
        "SNS:AddPermission",
        "SNS:Subscribe"
      ],
      "Resource": "arn:aws:sns:eu-central-1:054471322748:FlexMatchEventNotifications",
      "Condition": {
        "StringEquals": {
          "AWS:SourceOwner": "054471322748"
        }
      }
    },
    {
      "Sid": "__Console_pub_0",
      "Effect": "Allow",
      "Principal": {
        "Service": "gamelift.amazonaws.com"
      },
      "Action": "SNS:Publish",
      "Resource": "arn:aws:sns:eu-central-1:054471322748:FlexMatchEventNotifications"
    }
  ]
}
Delivery retry policy defines how Amazon SNS retries failed deliveries to HTTP/S endpoints. You can modify it but for this tutorial we will leave it by default.
Delivery status logging is optional as well, you can modify it but we will leave the default values.
The last section is Tags, as optional we don’t need to change it.
Click on “Create topic”.
We are going to use a Lambda function in order to use this SNS service.
For that, first we are going to create a DynamoDB NoSQL data base. Go to Create DynamoDB table and set the following values.
We will name it MatchmakingTickets, since we will use it to find new matchmaking tickets.
Table name: MatchmakingTickets
Primary key: Id type: String
Sort Key: Rank type Number
In the section Table Settings go ahead and uncheck “Use default settings”
In the field “Read/write capacity mode” check Provisioned since it’s free and we want to save some money. We might need to go for On-demand if our Game goes popular though.
Leave the rest of the fields as defaults and click “Create table“.
In the “Overview” field click on “Time to live attribute” and set it to ttl, so then it will be used to specify the time for the object to be deleted.
Now let’s create a Lambda function.
Go to Lambda functions and press Create function. Then Author from scratch and type the following:
Function name: GameLiftTrackEvents
Runtime: Node.js 12.x
Press “Create function”.
Now we are going to work locally first, for that, you need to have node.js installed. When we finish, we will create and use a Lambda layer with our zipped code.
Go to a directory of your choice and create a folder “nodejs”. Then execute the following command:
B:\AWS\GameLiftTutorial\LambdaLayer\nodejs>npm install aws-sdkCreate a zip file with the entire “nodejs” folder, including the files node.js created for us.
After that, go to your lambda function, and click on the right menu “Layers” and “Create layers“. Name it GameLiftTutorialLayer and upload your zip file nodejs.zip and choose your runtime.
Go to your Lambda functions again and select the function that you created, (GameLiftTrackEvents for us). Click on Layers and you should see a pop-up underneath. Click on “Add a layer” button.
Choose “Custom layers” on the radio button selection and search your created layer “GameLiftTutorialLayer” then click on “Add“.
Now go to your Function code editor and paste the following code:
const AWS = require('aws-sdk');
const DynamoDb = new AWS.DynamoDB({region: 'eu-central-1'});
const TypeToRank = {
    MatchmakingSearching: '1',
    PotentialMatchCreated: '2',
    MatchmakingSucceeded: '3',
    MatchmakingTimedOut: '4',
    MatchmakingCancelled: '5',
    MatchmakingFailed: '6'
};

exports.handler = async (event) => {
    let message;
    let response;
    if (event.Records && event.Records.length > 0) {
        const record = event.Records[0];
        if (record.Sns && record.Sns.Message) {
            console.log('message from gamelift: ' + record.Sns.Message);
            message = JSON.parse(record.Sns.Message);
        }
    }

    if (!message || message['detail-type'] != 'GameLift Matchmaking Event') {
        response = {
            statusCode: 400,
            body: JSON.stringify({
                error: 'no message available or message is not about gamelift matchmaking'
            })
        }
        return response;
    }

    const messageDetail = message.detail;

    const dynamoDbRequestParams = {
        RequestItems: {
            MatchmakingTickets: []
        }
    };

    if (!messageDetail.tickets || messageDetail.tickets.length == 0) {
        response = {
            statusCode: 400,
            body: JSON.stringify({
                error: 'no tickets found'
            })
        };
        return response;
    }

    for (const ticket of messageDetail.tickets) {
        const ticketItem = {};
        ticketItem.Id = {S: ticket.ticketId};
        ticketItem.Rank = {N: TypeToRank[messageDetail.type]};
        ticketItem.Type = {S: messageDetail.type};
        ticketItem.ttl = {N: (Math.floor(Date.now() / 1000) + 3600).toString()};

        if (messageDetail.type == 'MatchmakingSucceeded') {
            ticketItem.Players = {L: []};
            const players = ticket.players;

            for (const player of players) {
                const playerItem = {M: {}};
                playerItem.M.PlayerId = {S: player.playerId};
                playerItem.M.PlayerSessionId = {S: player.playerSessionId};

                ticketItem.Players.L.push(playerItem);
            }

            ticketItem.GameSessionInfo = {
                M: {
                    IpAddress: {S: messageDetail.gameSessionInfo.ipAddress},
                    Port: {N: messageDetail.gameSessionInfo.port.toString()}
                }
            };
        }

        dynamoDbRequestParams.RequestItems.MatchmakingTickets.push({
            PutRequest: {
                Item: ticketItem
            }
        });
    }

    await DynamoDb.batchWriteItem(dynamoDbRequestParams)
    .promise().then(data => {
        response = {
            statusCode: 200,
            body: JSON.stringify({
                success: 'ticket data has been saved to dynamodb'
            })
        };
    })
    .catch(err => {
        response = {
            statusCode: 400,
            body: JSON.stringify({
                error: err
            })
        };
    });

    return response;
};
Now go and configure a test event. For that click on “Configure test event“, and select hello-world, paste this code and click “Create“:
{
  "Records": [
    {
      "Sns": {
        "Message": "{\"detail-type\":\"GameLift Matchmaking Event\", \"detail\":{\"tickets\":[]}}"
      }
    }
  ]
}
Now let’s add permissions to access DynamoDB. Go to the permissions tab and click on the Role name. Then click in the only policy attached. Then click on “Edit Policy“. Go to the JSON tab and add the following (do not replace):
{
    "Version": "2012-10-17",
    "Statement": [
        {
            "Effect": "Allow",
            "Action": "logs:CreateLogGroup",
            "Resource": "arn:aws:logs:eu-central-1:054471322748:*"
        },
        {
            "Effect": "Allow",
            "Action": [
                "logs:CreateLogStream",
                "logs:PutLogEvents"
            ],
            "Resource": [
                "arn:aws:logs:eu-central-1:054471322748:log-group:/aws/lambda/GameLiftTrackEvents:*"
            ]
        },
        {
            "Effect":"Allow",
            "Action":"dynamodb:BatchWriteItem",
            "Resource":"arn:aws:dynamodb:eu-central-1:054471322748:table/MatchmakingTickets"
        }
    ]
}
Now let’s test the function again creating another test. Create a new test event and name it MatchmakingSearchingEvent. Paste this code:
{
  "Records": [
    {
      "Sns": {
        "Message": "{\"detail-type\":\"GameLift Matchmaking Event\", \"detail\":{\"type\":\"MatchmakingSearching\", \"tickets\":[{\"ticketId\":\"t1\",\"startTime\":\"2020-04-01T22:58:26.169Z\",\"players\":[{\"playerId\":\"p1\"}]}]}}"
      }
    }
  ]
}
This will create a new Item in the table MatchmakingTickets of type MatchmakingSearching. If we wait the time determined by the ttl this item will be deleted.
We still need to hock up this data to the SNS topic that it will be the one receiving the data.
Find SNS (or Simple Notification Service) in the search bar and open it. Go to topics and find “FlexMatchEventNotifications“. Click the button “Create subscription“. You’ll be prompt with a form containing the Topic ARN which is already filled up, and Protocol. Select Protocol AWS Lambda and find your created Lambda function in Endpoint.
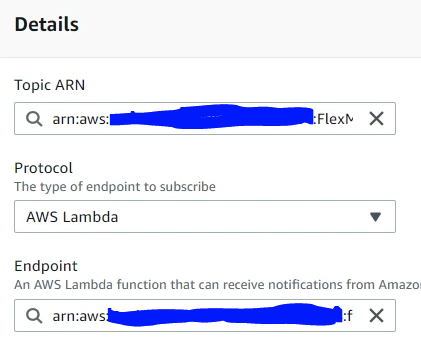
After that, create the subscription by clicking on Create subscription.
Now let’s test it. Go to your topic and click on Publish message.
Skip the optional fields and copy and paste the following inside Message body.
{
  "version": "0",
  "id": "cc3d3ebe-1d90-48f8-b268-c96655b8f013",
  "detail-type": "GameLift Matchmaking Event",
  "source": "aws.gamelift",
  "account": "123456789012",
  "time": "2017-08-08T21:15:36.421Z",
  "region": "us-west-2",
  "resources": [
    "arn:aws:gamelift:us-west-2:123456789012:matchmakingconfiguration/SampleConfiguration"
  ],
  "detail": {
    "tickets": [
      {
        "ticketId": "ticket-1",
        "startTime": "2017-08-08T21:15:35.676Z",
        "players": [
          {
            "playerId": "player-1"
          }
        ]
      }
    ],
    "estimatedWaitMillis": "NOT_AVAILABLE",
    "type": "MatchmakingSearching",
    "gameSessionInfo": {
      "players": [
        {
          "playerId": "player-1"
        }
      ]
    }
  }
}
This snip of code was taken from the official documentation https://docs.aws.amazon.com/gamelift/latest/flexmatchguide/match-events.html
You can skip the Message attributes. Now go ahead and click on Publish Message.
If everything is correct go to your DynamoDB table and you should see a new item. To test that our Lambda function was called you can go to your Cloudwatch, go to Log groups, find the name of your function GameliftTrackEvents, click on it you will see that the Lambda function was called with the correct data.
Now let’s create a Matchmaking configuration.
Search GameLift in your AWS console, click on Dashboard->Matchmaking configurations and click on Create matchmaking configuration.
Name:GameLiftTutorialMatchmaker
FlexMatch mode: WITH_QUEUE
Queue:eu-central-1 GameLiftTutorialQueue
Request Timeout:60
Notification target:arn:aws:sns:eu-central-1:054471322748:FlexMatchEventNotifications
Backfill mode: Manual
You can set a Request timeout in seconds, for our game, we will be setting 60 seconds.
Select your Rule set name from the list.
Copy from your FlexMatchEventNotifications Topic the ARN and paste it to Notification target.
We finally created all the pieces needed for matchmaking! tap yourself in the back!

